
Managing Returns (RMA)
Intershop Order Management supports different types and reasons for returns which are configured in the supplier setup.
Creating Return Requests
Note: This requires an order for which positions have been delivered and can be returned. Furthermore, for PICKUP, the customer and at least one delivery address must be given.
To create a return request, perform the following steps:-
Search for the order.
For details, see Searching Orders.
-
In the result list, click on the order number of the order for which you want to
create a return request.
This opens the order detail page.
- Open the Return requests tab.
-
Click Add first return request
 .
If there are already some return requests available, click Add additional return request in the lower right. Tip: You can also click the icon directly in the Return requests tab.The Create return request dialog opens.
.
If there are already some return requests available, click Add additional return request in the lower right. Tip: You can also click the icon directly in the Return requests tab.The Create return request dialog opens.Figure 1. Create return request 
-
Select a type: RETURN or PICKUP.
For PICKUP, a pickup address has to be selected.
- Add a comment (optional).
- Enter a position quantity greater than 0 and choose a return reason.
-
Specify additional attributes for which the keys must be unique (optional).
Attributes can contain information for a 3rd-party application.
-
Click Create to create the return request.
A success message appears and the request is listed below the Return requests tab.
Viewing Return Requests
-
Search for the order.For details, see Searching Orders.
-
In the result list, click on the order number for which you want to view the return
request.
This opens the order detail page.
-
Open the Return requests tab.
If available, a list of return requests appears.
-
Click the arrow button left of the request to view order positions.
The return request expands and displays the order positions.
Tip: To search or view orders with unprocessed return requests, use the overview widgets on the homepage or on the order page. You can also use the order search by selecting the Business query preset and the status Unprocessed return requests, see Simple Order Search.
Creating Return Confirmations from Existing Return Requests
Note:
This requires a return request with status ACCEPTED.
To create a return confirmation from an existing return request, perform the following steps:-
Search for the order.
For details, see Searching Orders.
-
In the result list, click on the order number for which you want to create a
return confirmation.
This opens the order detail page.
-
Open the Return requests tab.
If available, a list of return requests appears.
-
Click the
 icon in the Actions column.
This opens the Confirm return for order Dialog with pre-filled values from the return request.Tip: The Reason for return will be set according to the return request. If the reason is not available, you must specify a reason.Note: The quantity will be set according to the return request, even if larger than possible. If that is the case, you have to change it. The single comment is set to all comment fields of the form. The user may change it. If one of multiple suppliers has to be selected, the return type and reason is currently not set. The user has to select them depending on the supplier.
icon in the Actions column.
This opens the Confirm return for order Dialog with pre-filled values from the return request.Tip: The Reason for return will be set according to the return request. If the reason is not available, you must specify a reason.Note: The quantity will be set according to the return request, even if larger than possible. If that is the case, you have to change it. The single comment is set to all comment fields of the form. The user may change it. If one of multiple suppliers has to be selected, the return type and reason is currently not set. The user has to select them depending on the supplier. -
Click Save to create the return confirmation.
The return confirmation can now be viewed within the Returns tab.
Creating Return Labels
Note:
To create new return labels, a return of the order must be possible, i.e. it was delivered and can be returned.
To create a new return label, perform the following steps:
-
Search for the order.
For details, see Searching Orders.
-
In the result list, click on the order number of the order for which you want to
create a return label.
This opens the order detail page.
-
Click the Create new return label button
 in the upper right corner.
A confirmation dialog appears. This may take some seconds.
in the upper right corner.
A confirmation dialog appears. This may take some seconds. -
Click Create to confirm the return label creation.
A success message appears.
-
Open and reload the Documents tab.
After processing, the newly created return label appears below the Documents tab.
Sending Return Labels by E-mail on Demand
Note: To send a return label by e-mail, a
To send a return label by
e-mail, perform the following steps:CommunicationPartnerDO must be configured for the transmission type
SEND_CUSTOMER_MAIL_RETURN_LABEL, see Guide - IOM Shop Onboarding. -
Search for the order.
For details, see Searching Orders.
-
In the result list, click on the order number for which you want to send the
label.
This opens the order detail page.
-
Open the Documents tab and click Send e-mail with return label
 in the Actions column.
The Send e-mail with return label dialog opens.
in the Actions column.
The Send e-mail with return label dialog opens. -
Select an e-mail address and click Send.
A success message appears and the e-mail will be sent. After sending, the e-mail appears below the E-mails tab.
Adding Return Confirmation
-
Search for the order.
For details, see Searching Orders.
-
In the result list, click on the order number you want to edit.
This opens the order detail page.
-
In the Returns tab header, click the
 symbol.
Otherwise, open the Returns tab and click the icon. This opens the Confirm return dialog.
symbol.
Otherwise, open the Returns tab and click the icon. This opens the Confirm return dialog. Figure 2. Confirming product return 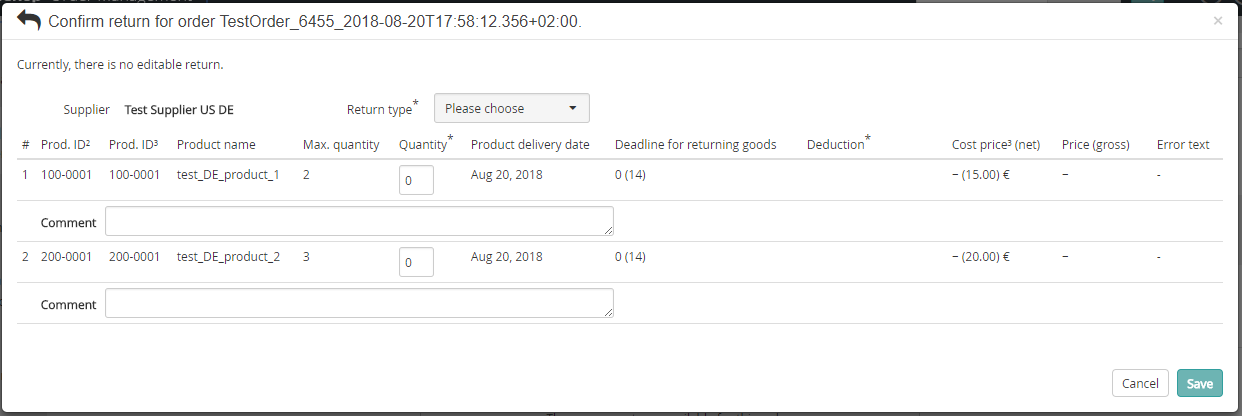
-
Specify the return details as necessary, then click Save.
Otherwise, click Cancel to discard your settings.