
User Interface Overview
This section describes the general UI structure and dialog design, with emphasis on navigation elements and recurring views.
Navigation Elements
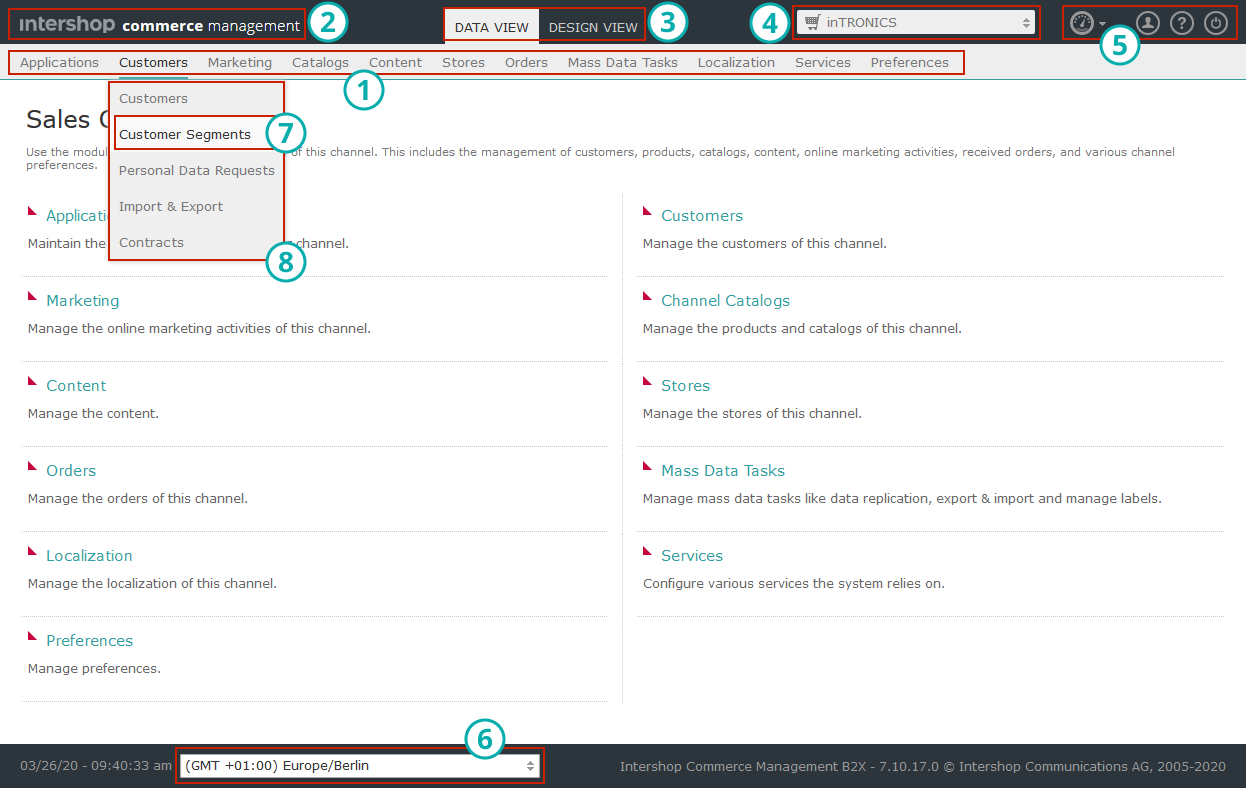
The main navigation element in Intershop Commerce Management is the navigation bar. Moreover, a number of navigation elements, such as the context select box and quick access buttons, reappear throughout the application.
 navigation bar
 home button
 view toggle
 context select box
 quick access buttons
 time zone selector
 manager
 section
The navigation bar, the context selection box and the quick access buttons are displayed in every view of Intershop Commerce Management.
Navigation Bar
The navigation bar is divided into sections. Each section provides access to managers for a certain type of objects in Intershop Commerce Management. The manager list in a section can be expanded or collapsed by clicking the section name.
To access a manager, click its name in the navigation bar.
Context Selection Box
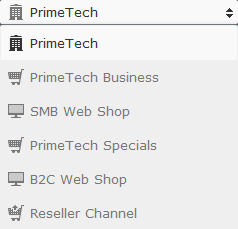
The context selection box is a drop-down list that displays the management contexts (or levels), which the current user is allowed to access, i.e., the organization, channels or applications. To select a context, expand the list and click the context name. The navigation bar changes and displays the sections available for the selected context.
Quick Access Buttons
The quick access buttons provide immediate access to certain functionality:
-
Home

Opens the Intershop Commerce Management start page in the current window.
-
Dashboards

Opens a menu that allows to access existing dashboards or to create a new dashboard.
-
Profile

Opens the user detail view for the current user to edit general and address information.
-
Help

Opens the online help in a new window.
-
Logout

Logs out the user from the current session and displays the log on screen.
View Toggle
The View Toggle is used to switch between the Intershop Commerce Management Data View and the Design View.
-
Data View
Switches to the Intershop Commerce Management Data View.
-
Design View
Switches to the "Design View", i.e., the editing mode of the sales channel storefront. The Design View allows content editors to create and manage content assets directly in the storefront, with the ability to immediately preview the effect of an action, e.g., the assignment of a component to a page slot, on the resulting page.
Time Zone Selector
The time zone selector is a drop-down list that allows for selecting a time zone for the current user's Intershop Commerce Management session. When switching the time zone here, be aware of the following issues:
-
The default time zone corresponds to the time set on the server that hosts Intershop Commerce Management.
-
The time zone setting made here overwrites the default setting and, if specified, the channel-specific time zone setting for the current user's Intershop Commerce Management session. It does not influence the time zone settings for the storefront applications.
-
The time zone setting made here is saved with the current user's preferences and remains valid until the user modifies this setting again. That is, just closing a session does not revert the setting to the default.
Dashboards
Dashboards are a means for centrally accessing relevant data, which can be configured to fit the needs of a particular organization and user role. In fact, a dashboard is a customizable set of views ("widgets") that display certain data and allow to navigate to the corresponding Intershop Commerce Management area.
Users can:
-
Create any number of named dashboards,
-
Add any number of widgets to a dashboard,
-
Resize widgets,
-
Rearrange widgets by simply moving them to another position,
-
Remove widgets.
The following sections outline the usage of dashboards.
Accessing Dashboards
-
Move the mouse pointer over the quick access button Dashboards.
This opens the dashboard menu, which includes an alphabetically sorted list of existing dashboards.
-
Select the intended dashboard.
Click the name of the dashboard you intend to open. This opens the selected dashboard.Tip:Clicking the quick access button Dashboards directly opens the first dashboard.Note:If there is no dashboard available, you are prompted to create a new one.
Creating Dashboards
-
Move the mouse pointer over the quick access button Dashboards.
This opens the dashboard menu.
-
Click Create Dashboard.
This displays the Create Dashboard box.
- Specify a name for the new dashboard.
-
Click OK.
This creates the new dashboard. To abort the operation, you can click Cancel, click the close icon (x) or press the ESC key on your keyboard.
Renaming Dashboards
-
Move the mouse pointer over the quick access button Dashboards.
This opens the dashboard menu.
-
Select the intended dashboard.
Click the name of the dashboard you intend to delete. This opens the selected dashboard.
-
Select Edit | Rename.
This displays the Rename Dashboard box.
-
Specify a new name, then click OK.
This renames the dashboard.
Deleting Dashboards
-
Move the mouse pointer over the quick access button Dashboards.
This opens the dashboard menu.
-
Select the intended dashboard.
Click the name of the dashboard you intend to delete. This opens the selected dashboard.
-
Select Edit | Delete, and confirm the operation.
This removes the selected dashboard and returns you to the Intershop Commerce Management start page.
Adding Widgets to Dashboards
-
Move the mouse pointer over the quick access button Dashboards.
This opens the dashboard menu.
-
Select the intended dashboard.
Click the name of the dashboard to which you intend to add a widget. This opens the selected dashboard.
-
Click Add Widget.
This opens a dialog that shows the available widgets.Tip:Currently, the following widgets are available:The available widgets are grouped in categories. Select a category to restrict the widget list to a specific group.
Table 1. Available widgets Widget Description Channel Tree Allows easy access to all channels and applications. Configurable URL Renders the specified URL. Order Overview Displays order statistics. Product Approval Status Shows products with the selected approval status. Product Completeness Displays the result of a product completeness check for the configured channel and the selected assortment. Product Overview Displays the result of a product statistics check for the configured channel. -
Click Add next to the desired widget.
This adds the widget to the current dashboard. The dialog remains open so that you can add other widgets.
-
Click Close to close the Add Widget dialog.
This displays the dashboard page. The recently added widgets are highlighted until you refresh the page or open the Add Widget dialog again.
Configuring Widgets
-
Move the mouse pointer over the quick access button Dashboards.
This opens the dashboard menu.
-
Select the intended dashboard.
Click the name of the dashboard on which you intend to move a widget. This opens the selected dashboard.
-
Click the
 icon in the upper right corner of the widget to be configured.
This highlights the widget to be configured and diplays a configuration dialog box.
icon in the upper right corner of the widget to be configured.
This highlights the widget to be configured and diplays a configuration dialog box. -
Edit the configuration values as required.
The available options depend on the widget type.
-
Click OK.
This reloads the widget and closes the configuration dialog.
Moving Widgets
-
Move the mouse pointer over the quick access button Dashboards.
This opens the dashboard menu.
-
Select the intended dashboard.
Click the name of the dashboard on which you intend to move a widget. This opens the selected dashboard.
-
Click and hold the titlebar of the widget to be moved, drag the widget to the intended position and release it.
The new widget position is saved immediately.Note:Widgets can be moved along the predefined grid (rows and columns) of the dashboard. If there is already a widget in the target position, it is moved down one row.
Resizing Widgets
-
Move the mouse pointer over the quick access button Dashboards.
This opens the dashboard menu.
-
Select the intended dashboard.
Click the name of the dashboard on which you intend to resize a widget. This opens the selected dashboard.
-
Click and hold the bottom right corner of the widget to be resized, drag the corner to resize the widget as intended and release it.
The new widget size and position are saved immediately.Note:Widgets can be resized within the predefined grid (rows and columns) of the dashboard. If there is a widget in the target position, it is moved down the number of overlapping rows.
Deleting Widgets
-
Move the mouse pointer over the quick access button Dashboards.
This opens the dashboard menu.
-
Select the intended dashboard.
Click the name of the dashboard from which you intend to delete a widget. This opens the selected dashboard.
-
Click the
 icon in the upper right corner of the widget to be deleted.
This highlights the widget to be removed and diplays a confirmation box prompting you to confirm the deletion.
icon in the upper right corner of the widget to be deleted.
This highlights the widget to be removed and diplays a confirmation box prompting you to confirm the deletion. -
Click OK.
This removes the widget from the dashboard.
Views
This section describes the views that are common throughout Intershop Commerce Management.
Overview Page
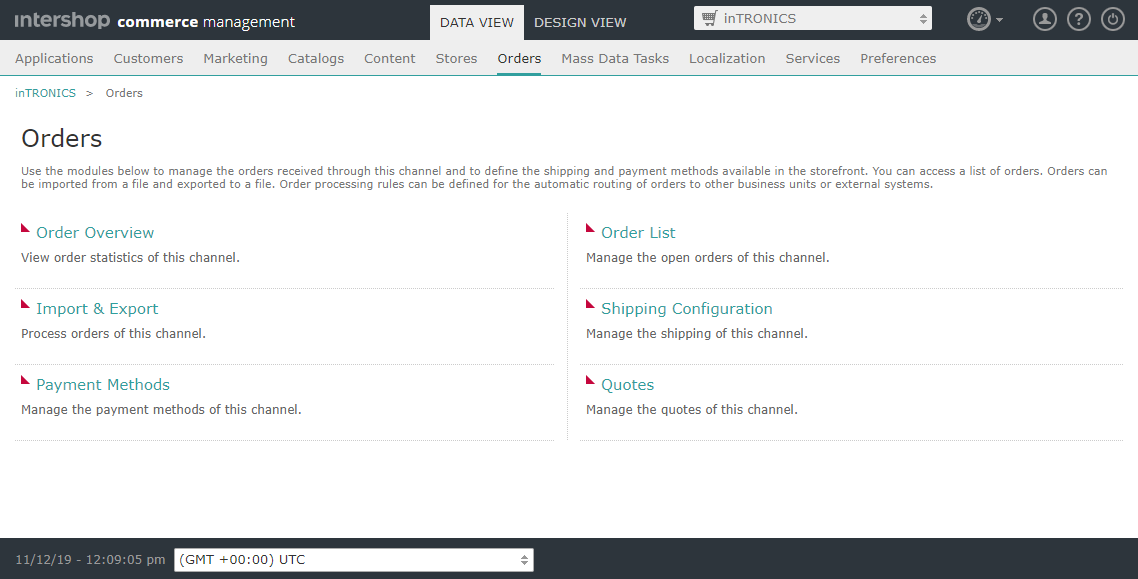
The sections and a number of managers start displaying an overview page. Overview pages list tasks or processes available in the corresponding section or manager, and allow for executing the displayed tasks or controlling the displayed processes.
List View
A list view displays a list of objects in a table.
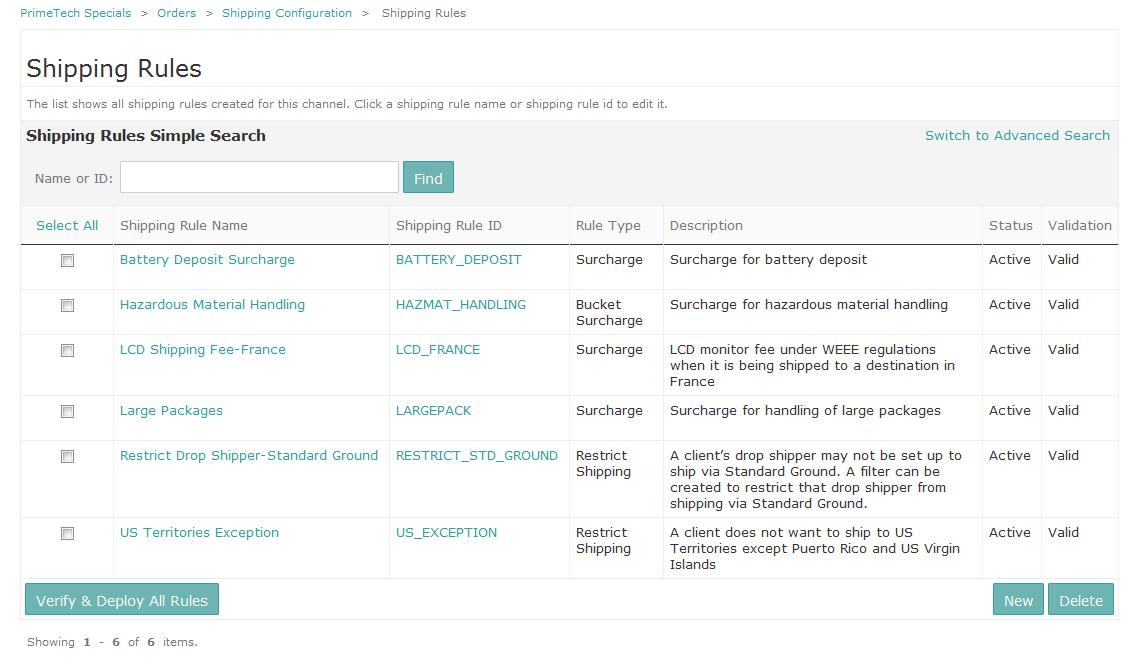
Most list views provide select checkboxes that allow for selecting a single or multiple objects from the list in order to perform certain actions. Larger lists are presented on multiple pages, where a paging bar facilitates the navigation. Selections made on a page are kept when switching to another page.
If a column header is displayed as a link, you can use it to sort the list by this attribute. Generally, one click produces a descending list, and another click produces an ascending list.
If the name of an object or its ID is displayed as a link, you can access a detail view for this object by clicking the link.
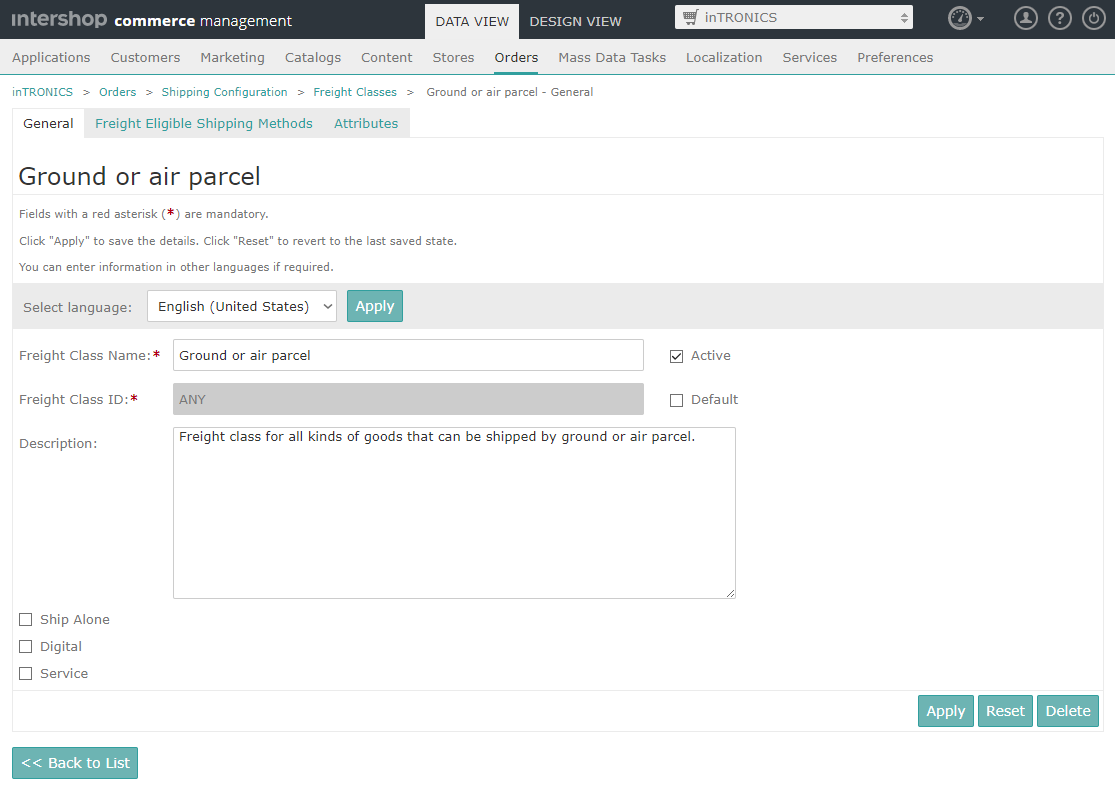
Detail View
A detail view provides more information on an object. The information can be presented all on one page, or grouped on several tabs.
Product detail views include additional buttons that allow for switching to the next or the previous product (![]() ,
, ![]() ).
).
Common Buttons
The following table describes the common buttons that are used throughout Intershop Commerce Management.
| Button Name | Description |
|---|---|
| OK | Saves the changes you have made, closes the current screen and returns you to the list. |
| Cancel | Discards the changes you have made, closes the current screen and returns you to the list. |
| Apply | Saves the changes you have made leaving you on the current page. |
| Reset | Discards the changes you have made and restores the previous saved state. |
| New | Starts the process for creating a new object. Opens either a general detail screen or an object creation wizard. |
| Delete | In list views, deletes the selected objects. On detail pages, deletes the current object and returns you to the list. |
| Next >> | In wizards, saves the changes you have made in the current step and takes you to the next step. |
| << Previous | In wizards, saves the changes you have made in the current step and returns you to the previous step. |
| Finish | In wizards, saves the changes you have made in the last step and completes the wizard. |
| << Back to List | Closes the detail view and returns you back to the list without saving anything. |
| << Back | Closes the current page and returns you to the previous page without saving anything. |
| Edit Selected | In list views or search result lists, starts a process for editing a selected set of objects in batch mode. |
| Edit All | In list views or search result lists, starts a process for editing all objects in the list in batch mode. |
| Find | In searches, executes the search with the given parameters. |
|
|
Locks an object for editing. |
|
|
Releases an object lock. |
Quick Navigation
Intershop Commerce Management provides a simple search that helps you to easily find and access available management areas. To use the quick navigation:
-
Press CTRL+Space.
This opens the quick navigation dialog.
Figure 6. Quickly navigating to a Intershop Commerce Management page 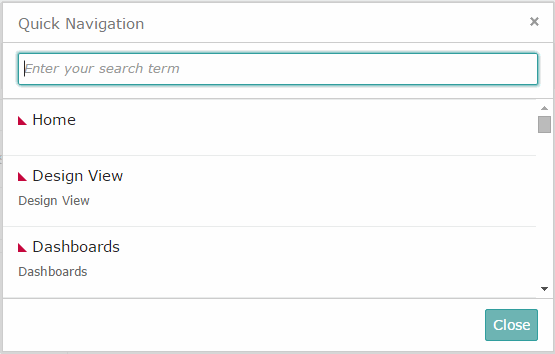 Note:The quick navigation works on all Intershop Commerce Management pages except the Design View or when text input fields are already selected.
 -
Enter your search term.
The result list is updated immediately as you type.
-
Select the search result.
You can either:
-
Use the mouse to navigate to and select the intended management area, or
-
Use the keyboard: Move Down/Up arrow keys or TAB/SHIFT+TAB to navigate and ENTER to select.
-
Press ESC,
-
Click Close or the
 icon, or
 -
Click outside the quick navigation dialog.
-
General Search Options
For text string searches, there are some common options supported throughout Intershop Commerce Management, irrespective of the search context (products, users, etc.) or the search type (simple or advanced search).
The following table lists the common search expression syntax.
| Search Expression | Description |
|---|---|
| word | Executes a fuzzy word search for the given string. |
| wo?d | Executes a wildcard search where the question mark substitutes any one character. |
| wo* | Executes a wildcard search where the asterisk substitutes any zero or more characters. |
| +word | Executes an exact word search for the given string. |
| "word a" | Executes an exact sub-string search for the given string. |
| -word | Excludes the given string from the search. |
| -"word a" | Excludes the given string from the search. |
| LCD monitor | Combines the two strings using the logical operator defined as default for the current search (OR for product search and user search, AND for content asset searches). |
| LCD & CRT | If the default logical operator is OR, forces a logical AND combination. |
| LCD | CRT | If the default logical operator is AND, forces a logical OR combination. |
| <<none>> | In attribute value fields (advanced searches), executes a search for an empty string, i.e., for attributes without values |