
Storefront Content Editing (Responsive Starter Store)
As an alternative to using Intershop Commerce Management, content managers can create and manage content assets directly in the storefront by entering the storefront in the Design View or "Editing" mode. The Design View makes it possible to preview the effect of an action immediately, e.g., the assignment of a component to a page slot, on the resulting page.
For storefront content editing to work, your storefront application must be prepared accordingly. That is, the pagelet models are created, the editable page areas are defined and the intended interactions are implemented in the application.
The Design View is divided into four main areas:
-
The palette, which provides tiles of components and media assets for drag and drop creation of new components (the palette is closed by default)
-
The render area, which renders the page and displays the preview, with the currently selected asset highlighted
-
The content structure tree, which is used to navigate through the previewed content structure including page, page variant, components, includes, categories, products, etc.
-
The content edit area, which displays the available editing options for the currently selected element in the content structure tree
The Design View provides two modes:
-
The Inspect mode highlights the rendered parts of the page and helps to navigate easily to that part that has to be edited.
-
The Layout mode displays all slots and placeholders on a page to extend or change the page layout via drag and drop.
Setting Default Preview Application
- Select the intended channel or application from the context selection box.
-
Click the Profile quick access button
 .
This displays the user detail view.
.
This displays the user detail view. -
Select the default preview application.
Select an available application from the Preview Application drop-down list.
-
Click Apply to save your settings.
Otherwise, click Reset to discard your changes.
Launching Design View
- Select the intended management context from the context selection box.
-
Click the Design View button.
This opens the storefront in the editing mode.
-
Select the required settings for which you intend to edit the content.
Click the Settings button (
 ) to open the preview configuration dialog. Note:The following settings are available:The settings button is available if the application type, on which the application opened in Design View is based, is set to allow for configuring the preview settings.
Table 1. Storefront preview settings Setting Description Date/Time Specifies the date and time intended to be applied for the current preview session. Select Current to preview the current state, or select Fixed to set an arbitrary date and time for the preview. Application Specifies the storefront application intended to be previewed. Language Specifies the locale intended to be applied for the current preview session. Currency Specifies the currency intended to be applied for the current preview session. Customer segments Specifies the customer segments intended to be applied for the current preview session. Depending on the activated segmentation services (see Customer Segments), two groups of target objects may be listed, for which the available customer segments are eligible: -
Content components, shipping rules and payment methods
-
Promotions, campaigns, A/B tests, price lists
Catalog settings Specifies the category/product visibility settings for the current preview session, including -
Making all products visible, overruling any product-specific settings
-
Making all products available for purchase, overruling any product-specific settings or inventory statuses
-
Making all categories visible, overruling any category-specific online/offline settings
-
Turning off catalog views, overruling any catalog view filter settings that may be active.
Display size Specifies the display size intended to be applied for the current preview session, which allows for checking the application display on various devices. Status Specifies whether important preview settings (like date/time or display size) are shown in the current preview session. Full Site Preview Opens a preview session in a new window, which hides the content structure tree and the content edit area as well as all Intershop Commerce Management navigation elements. Reset to Default Discards all specific settings, reverts to the default status and refreshes the preview session. -
-
Click OK.
This immediately applies your settings and refreshes the preview. Otherwise, click Cancel to discard your settings.
Accessing Content Assets
Generally, there are two ways to access the content assets intended to edit:
-
Navigating through the content structure tree, or
-
"Inspecting" the elements shown in the render area.
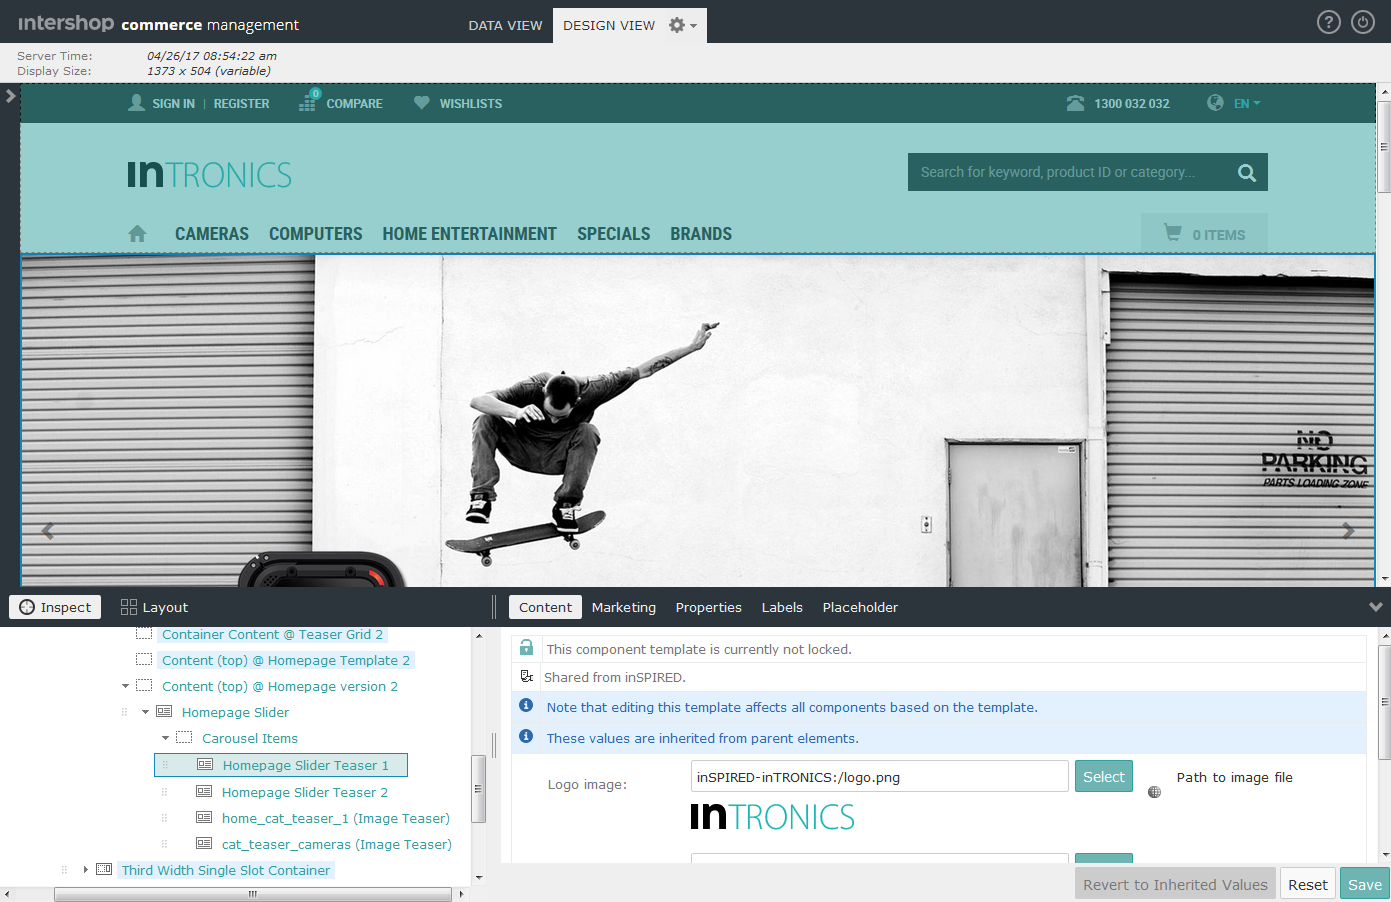
Navigating the Content Structure
-
Select the intended management context from the context selection box, then click the Design View button.
This opens the storefront in the editing mode.
-
In the render area, navigate to the intended page.
The content structure tree shows the content asset structure of the current page.
-
In the content structure tree, click the arrow buttons in front of the element names to expand the child elements.
Continue until you reach the content asset you intend to view or edit.
-
Click the name of the intended element.
The selected element is highlighted in the render area and its editable properties are displayed in the content edit area.
Inspecting Content Assets
-
Select the intended management context from the context selection box, then click the Design View button.
This opens the storefront in the editing mode.
-
In the render area, navigate to the intended page.
The content structure tree shows the content asset structure of the current page.
-
Click Inspect on top of the content structure tree.
When hovering over an element in the render area, the borders of the current element are made visible now.
-
Click the intended element in the render area.
The selected element is highlighted in the render area and its editable properties are displayed in the content edit area.
Editing Content Assets
| Element Type | Icon | Available Editing Options |
|---|---|---|
| Page |
|
Properties (edit locale, name, description, parent, view ID, type), Page Variants (create and manage page variants assigned to the page), Sub Pages (create and manage assigned child pages), Labels (create and manage labels assigned to the page) |
| Include |
|
Properties (edit locale, name, view ID, type), Components (create and manage components assigned to the include), Labels (create and manage labels assigned to the include) |
| Page Variant |
|
Content (edit the configurable parameters as provided by the type), Properties (edit locale, name, publishing status and period, assignments to business objects, view ID, template), Labels (create and manage labels assigned to the page variant), Placeholders (for template-based page variants, create and manage components assigned to the placeholder) |
| Component |
|
Content (edit the configurable parameters as provided by the type), Properties (edit locale, name, publishing status and period, assignments to business objects, view ID, template), Labels (create and manage labels assigned to the component), Placeholders (for component templates, create and manage components assigned to the placeholder) |
| Slot |
|
Assignments (create and manage components assigned to the slot) |
| Placeholder |
|
Assignments (create and manage components assigned to the placeholder, configure the rendering of the default content) |
| Catalog Category |
|
Properties (view name, ID, description), Edit Category Information (opens the current category in the Intershop Commerce Management category detail view) |
| Product |
|
Properties (view name, ID, short description, long description), Edit Product Information (opens the current product in the Intershop Commerce Management product detail view) |
To edit content assets:
-
Select the intended management context from the context selection box, then click the Design View button.
This opens the storefront in the editing mode.
-
Navigate to the element you intend to edit.
In the content structure tree, click the arrow buttons in front of the element names to expand the child elements. Continue until you reach the content asset you intend to view or edit.
-
Edit the details as necessary and click Save.
The changes are applied immediately, and the render area updates the preview correspondingly. For details about the available editing options, refer to the table above.